SNES Assembly Adventure 07: Direct Memory Access and Bouncing Sprites
30 May 2019
Reading time ~16 minutes
Update February 2022: All code examples from all articles in this series can now be found on Github in one repository
Welcome back, Adventurer! Last time, we learned a bit more about subroutines and how to pass arguments to them.
This time, we’ll see this in more concrete action and
- revisit the sprite demo from part 4
- make the code more reusable by replacing some sections with subroutines
- move data from WRAM to OAMRAM with DMA, or Direct Memory Access
- make the sprites move and bounce off the screen boundaries
So lots to get to. Let’s get started!

Sprite Demo Revisited
Let’s look at the sprite demo code again:
If we scan the code closely, we see that there is a lot of code repetition. For example, the two loops VRAMLoop and CGRAMLoop starting at lines 42 and 58 respectively are almost identical. The same goes for the code between lines 74 and 112 that set up the OAMRAM data for all four sprites. If you have programmed in any other language before, you’d probably immediately go for a function to keep your code shorter, more readable, and concise.
We will replace those two sections mentioned above with subroutines. These subroutines will be very useful later on when we write more complicated demos and games. Moving data to VRAM, CGRAM, and OAMRAM is something we do pretty much every frame.
So let’s start by moving some of the repetitive code into subroutines:
This code shouldn’t hold any surprises for you by now. We simply moved the code for loading VRAM, CGRAM, and OAMRAM into subroutines and replaced the moved code sections with subroutine calls. Easy.
But there’s still room for improvement. In LoadVRAM, we use the label SpriteData to access the sprites’ raw data in memory. While this works, what if you want to load memory from another memory location than SpriteData? You’d need to rewrite the whole subroutine. Not very convenient.
But thankfully, there’s a solution.
Passing Addresses as Arguments
Last time, we learned how to pass arguments to subroutines. We’ll use this now to improve LoadVRAM. So, what information does the subroutine needs to perform its task? In essence, it needs three bits (no pun intended) of information:
- The number of bytes to be transferred to VRAM
- The source address where the sprite data is stored
- The VRAM starting address
We’ll pass the arguments by stack. Let’s see this in action, here’s the updated code:
Here you see two updated code excerpts. Let’s go through it line by line.
Lines 47 through 54: This should look really familiar to what we did last time when passing arguments by stack. But here is a new instruction:
pea : Push Effective AddressPush Effective Address or PEA pushes a 16-bit word onto the stack. Mind that PEA pushes the exact value onto the stack given to it as an operand. Some assemblers will allow pea #$0000, but most don’t. I mention this because at times people get thrown off by PEA. pea $1234 will push the bytes $12 and $34 onto the stack, not the byte at $1234. Also, PEA will always push two bytes to stack, so something like pea $80 will not work. That’s why we use LDA and PHA in lines 51 and 52 to push a single byte to stack.
So, we push first the VRAM starting address to stack, followed by the source address, and finally, the number of bytes we want to transfer to VRAM. No surprises here.
Lines 57 and 64 might look a bit odd. This is an optimization trick to save CPU cycles. If you look at the code from the article on subroutines and arguments, after the subroutine call, we had to “clean up” the stack by pulling back as many bytes as we pushed to stack before the subroutine call. This can be achieved more easily by simply storing the old stack pointer value in X before pushing all arguments to stack. Then, in the subroutine (line 125) we first save the old stack pointer with PHX on the stack. Then we execute the subroutine normally. Then, after the subroutine, we simply pull the old stack pointer from the stack back into X and transfer it back to the stack pointer register (line 155).
This might look a bit weird at first. But the essential thing to understand is that the stack pointer has the exact same value before you push all arguments to stack, and after the subroutine has been called. This ensures you’ll never run into problems due to stack over- or underflows or wrong return addresses.
Next, let’s look at the subroutine itself.
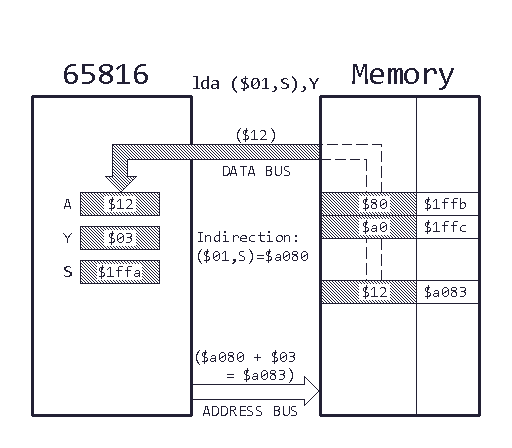
Lines 125 through 157: This is essentially the same code as before. We add the creation of a frame pointer and local symbols to access the arguments on the stack. The interesting new thing here is found in lines 144 and 147. It’s a new addressing mode! Let’s look at Stack Relative Indirect Indexed Addressing:

You know Stack Relative Addressing, and Absolute Indexed Addressing already. Think of it as a combination of the two. The effective address is the indirect address found on the stack, offset by a constant (the one given in the operand). Then, this base address is offset again by (the value in) Y.
Another way to look at it is to think of the address passed on stack as a pointer to the first element of an array. Then Y is the index to access a specific element in that array.
It might seem a bit convoluted yet, but once you get more experience with machine programming, you’ll come to appreciate indirection and offsets in addressing. They make your code more flexible.
I’ll additional information about indirect addressing in the Links and References section at the end of this article.
Lines 164 through 194: This shouldn’t surprise you either, it’s pretty much the same as in the LoadVRAM subroutine.
If you’re struggling with Stack Relative Indirect Indexed Addressing, check out page 23 of the 65C816S datasheet.
The rest of the code hasn’t changed so far. Now, if you think the code in LoadOAMRAM looks a bit ugly and inefficient, you are right. We’ll now finally add some action by making the sprites move each frame and bounce off the screen boundaries.
Make the Sprites Move and Bounce
Let’s finally add some action to this demo! Before we start, here are a few things to keep in mind to understand the code in this section:
- We cannot access VRAM and OAMRAM directly, we have to use memory mapped registers to access and modify what is displayed on the screen
- The OAMRAM holds the sprite name/index, color, and position data for each sprite
- The
NMIHandlersubroutine is called each frame during V-blank
Here’s how we’re going to do it. Instead of setting data in OAMRAM “manually”, as we did in LoadOAMRAM, we will designate a section in WRAM for OAM data and copy the whole OAMRAM mirror section from WRAM into OAMRAM each frame. For this, we will use a new technique called Direct Memory Access, or DMA. This might be a bit of a big leap, but I’ll try my best to explain it in detail. I’ll revisit DMA in the future several times.
This is a technique used in many SNES games. Since we can access WRAM directly without going through memory mapped registers first, it is easier for us to update the position, color, etc. of sprites this way and then copy it into OAMRAM in one go.
So we need to write three new sections of code:
- Designate a section of VRAM as our OAMRAM mirror
- Game logic code that updates the OAMRAM mirror; that is, move the sprites and check for collisions with the screen boundaries
- A subroutine that copies the OAMRAM mirror into OAMRAM each frame
So, let’s dive into the code. As always, I show you the code first, then go through the changes line by line. Most of it is a copy of SpriteDemo3.s above, so I’ll highlight the differences only.
Lines 17 through 25: These are some new labels we’ll use for setting up and using Direct Memory Access.
Lines 28 through 32: We’ll use this memory location to store the horizontal and vertical speed of the sprites, and the (starting) address of the OAMRAM mirror in WRAM. Remember that we can access parts of the SNES’ WRAM from the addresses $00:0000 ~ $00:1fff.
Lines 34 through 45: These are a bunch of constants to make our code more readable. We’ll see them in action shortly.
Lines 61 through 91: Nothing new here. We initialize the SNES and copy the sprite and color data into VRAM and CGRAM, respectively.
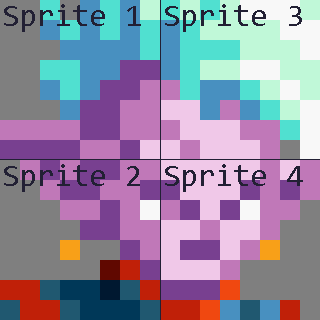
Lines 93 through 158: This section is new. Basically, we write all data needed to display the four sprites into WRAM. We use the constants we defined earlier to position all four sprites at the center of the screen. Then, in OAMLoop, we move the other 124 sprites off screen, so they don’t interfere with the sprites on screen.
If this section is a bit confusing, revisit Part 4 where we talked about sprites and what data is needed to display them on screen. I’ll also link some extra information in the Links and References section at the end of this article.
Lines 160 through 163: We initialize the (initial) horizontal and vertical speed of the sprites. Mind that we could use constants only for this throughout the code. I chose to use “variables” (i.e., a memory location) to make the code more flexible and easier for you to experiment with.
Now, let’s get to the real juicy bits.
Lines 185 through 269: This is our main game loop. Here is the new code that will move the sprites each frame according to the speeds we just stored in HOR_SPEED and VER_SPEED. This code has two sections: First, we check for horizontal (i.e., the left and right screen boundaries) collisions, then we check for vertical collisions (i.e., top and bottom of the screen). Please keep in mind that this main game loop is not optimized; there’s a lot of code repetition and redundancies. My goal was to write the code as logically and as simple as possible to follow. As you gain experience, you’ll be able to cut down code size and cycle count easily on this game logic.
First, in lines 192 and 193 we check whether the current speed is positive/to the right, then we skip the check on the check for the left screen boundary (the sprite can’t hit the left screen boundary while it is moving right). BPL is a new instruction:
bpl : Branch if PLusBPL will branch if the result of the last operation is positive; i.e., if the most significant bit of the result (of the last operation) is clear.
If the horizontal speed is not positive (BPL didn’t not branch), we calculate the new position and check it against the left screen boundary.
Lines 195, 196, and 197 take the horizontal position of the first sprite and add the speed to calculate the new position. Then we the carry flag to check whether the value crossed the zero boundary (i.e, went below zero). If you’re unsure why and how this works, freshen up your knowledge on two-complements binary number arithmetics. If the new position is below zero, BCS in line 197, the sprite moved beyond the left screen boundary; so we reset the horizontal sprite position to zero and branch to a section of code to invert the speed.
Lines 203 through 211 are pretty much a mirror of the left screen boundary check directly above it, except we reset the position to sprites to the left of the right screen boundary.
Lines 213 and 214 are the “standard case”: If there was neither a collision with the left or right screen boundary, we simply store the new horizontal position in the OAMRAM mirror and branch to the vertical collision check.
Lines 216 through 221 are only executed if there was a collision with the left or right screen boundary before. We load the current speed, invert all bits, and add one to it; better known as the two-complements of a number (i.e., we change the sign/direction of the speed).
Lines 224 through 255 are again a mirror of the horizontal check for the vertical collision of the upper and bottom screen boundaries. If you carefully studied the horizontal collision code, this section will hold no surprises for you.
Lines 257 through 270: Now that we’ve calculated the correct new position of the first of the four sprites, we need to update the other three. Since we know how the other three sprites are positioned relative to the first, we only need to add the sprite size to the new horizontal and vertical position of the first sprite and store it as position data for the other sprites. We know that each sprite needs four bytes of data in OAMRAM, so the offset for accessing the data of the other sprites is four.

If you feel like this is a very cumbersome way to update sprites that always move together, you’re correct. In a later article, I’ll introduce you to metasprites. Metasprites will make it easier to manage game characters, bosses, etc. made up of several sprites and are very common among 8- and 16-bit games.
I’d again like to stress that this game logic code has a lot of code repetition and potential for optimization. But I wanted to keep it simple to follow and understand.
Keen observers will have noticed that I didn’t use two constants at all, namely, SCREEN_LEFT and SCREEN_TOP. This is for you to experiment. Can you make the sprites bounce only on the right half of the screen? Or the lower half? Give it a try!
Lines 279 through 289: This is the updated subroutine NMIHandler. This subroutine is called each frame during V-blanking. We haven’t talked about this in detail, but many of the memory mapped registers can only be used during V-blanking; i.e., you can’t update graphics (VRAM, OAMRAM, etc.) while the PPU is drawing stuff on the screen.
The new code inside the NMIHandler shouldn’t surprise you. We move the address of the OAMRAM mirror onto the stack (to pass it as an argument to the subroutine), then call the new subroutine UpdateOAMRAM, which we will discuss shortly.
Lines 295 through 375: Nothing new here. Check SpriteDemo3.s above for a detailed description.
Lines 381 through 408: Now, this is the most important new code. The subroutine UpdateOAMRAM uses Direct Memory Access to copy the OAMRAM mirror from WRAM into OAMRAM. Let’s see how this works.
Lines 382 through 388 should be pretty familiar by now. Last time, we talked about frame pointers and how they work.
Lines 391 through 399 hold the important bits. If we want to move data from one memory segment to another, we need to know (or let the SNES know, to be precise) three things:
- where to move the data to (destination)
- where to take the data from (source)
- and how many bytes we want to move (size)
There are a total of seven DMA channels on the SNES. If you’d find yourself in a situation where you’d need to move several segments of memory of other segments of memory at the same time, that’d be possible. You’d just set up every channel individually and then start DMA. We’re only moving data from WRAM to OAMRAM, so we’ll only use DMA channel 0.
To provide the SNES with all necessary information, we again use memory mapped registers. First, we use DMAP0 to configure DMA channel 0. Direct Memory Access is very flexible. I’ll go into more detail in a later article about this; here we set the DMA to the simplest kind of transfer, copy one byte of data from the source (WRAM) and write it to a (memory mapped) register (i.e., the DMA destination), and increment the source address by one after each read-write-cycle. I’ll provide some links in the Links and References section at the end of this article that explains this in more detail. We’ll look more closely at this (and HDMA) in a later article, so trust me on this for now.
Next, we use BBAD0 register to set the destination to $04. The destination of a DMA must be one of the memory mapped registers in the $21XX range (this is where all memory mapped registers concerning graphics are located). Since we want to move data to OAMRAM, we set it to $04 which will result in a destination address/register of $2104; which is the OAMDATA register.
Then we use A1T0L, A1T0H, and A1T0B to set the destination address. We load the address of the OAMRAM mirror (earlier passed on stack) and set it as the source address. Since the use the WRAM mirror in bank 0, we use STZ to set the bank of the address to zero.
Lastly, we set the number of bytes to be transferred to $0220, which is the whole OAMRAM mirror (and the total size of OAMRAM).
Now that DMA is set up, we only need to tell the SNES to start the transfer. For this, we use the MDMAEN register to start the transfer on channel 0. If we wanted to start several DMA channels, we would set the appropriate bit in line 401 (bit 0 for channel 0, bit 1 for channel 1, etc.).
Once the DMA is done, we only need to restore the caller’s frame and stack pointer, then we can return to the caller.
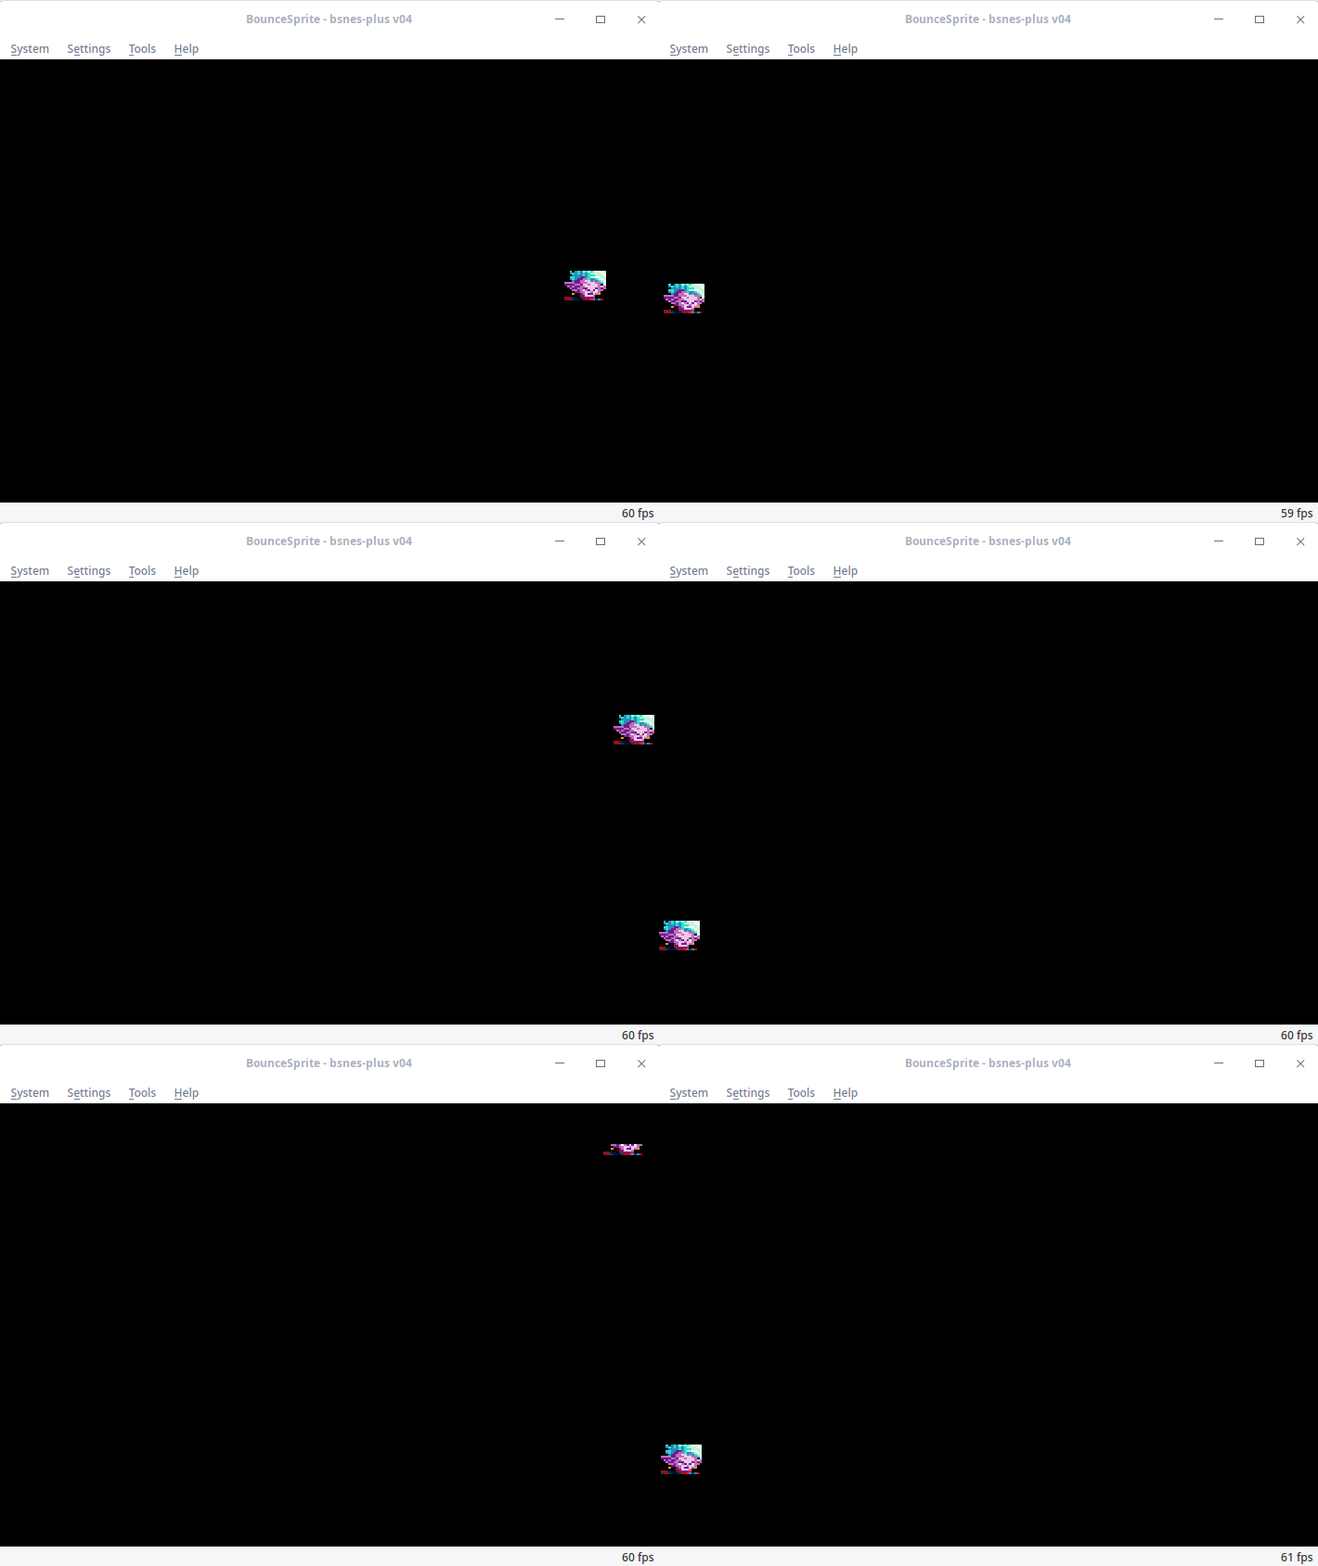
If you build this code and run it in your emulator, this is what you should see:

Congratulations! Your first moving sprites!
Conclusion
There was a lot of new stuff here, so make sure to study the code examples closely. I’d also encourage you to experiment a bit. Can you make the sprites bounce only on the right half of the screen? Can you modulize the game logic code with subroutines? Make each sprite move and bounce individually? Bounce off each other? Challenge yourself!
Next time, we’ll learn how to read the joypad and make the sprites react to your input.
Lastly, I’m very sorry this update took so long; I’ve been working on a few other things but I’m determined to return to a weekly Thursday schedule as promised. Your feedback is much appreciated and a huge motivation! Stay tuned!
Links and References
- A good explanation of DMA from the Super Famicom Development Wiki
- A detailed explanation of OAMRAM from the same Wiki
- Retro Game Machines Explained has an excellent series of videos explaining how the SNES works, I can’t recommend them enough!
- A short explanation of indirect and indexed addressing
- This post on NES Doug’s excellent blog explains the basic idea behind metasprites
- All SNES Assembly Adventure code examples of this series on Github