Welcome back, Adventurer! Last time, we learned how to use CMake and cc65 to automate the build process.
This time we’ll refactor the modular example from the previous article to become a more general project template we can use in the future. This project template will
- have a handful of helper subroutines for loading and clearing VRAM, CGRAM, and OAM, handling the joypad;
- initialize the SNES to be in a defined state; i.e., clear all memory and set registers to predefined values;
- have a simple main game loop and a v-blank loop that does nothing.
The final project template can be found on GitHub.
We’ll only make small changes to the overall structure. Let’s go.
What We Got So Far
Currently, the directory structure looks like this:
snes_cradle/
    assets/
        Assets.inc
        Assets.s
        CMakeLists.txt
        SpriteColors.pal
        Sprites.vra
    cmake/
        CMakeCA65816Compiler.cmake.in
        CMakeCA65816Information.cmake
        CMakeDetermineCA65816Compiler.cmake
        CMakeTestCA65816Compiler.cmake
    src/
        common/
            CMakeLists.txt
            GameConstants.inc
            MemoryMapWRAM.inc
            Registers.inc
            Vector.s
        Game/
            CMakeLists.txt
            Init.inc
            Init.s
        PPU/
            CMakeLists.txt
            PPU.inc
            PPU.s
        CMakeLists.txt
        JoypadSprite.s
    CMakeLists.txt
    MemoryMap.cfg
The most changes we’ll make are to src/Game/Init.s and src/JoypadSprite.s. Then we’ll add a set of new files to make the code to read the joypads more reusable.
Refactor JoypadSprites.s
Here’s what we got currently have in src/JoypadSprites.s:
The code we wrote to read the joypad in part 8 is embedded in the main game loop GameLoop (line 48). While that’s useful for a simple demo, usually, we’d want our input handling to be its own subroutine. So we’ll extract this section of code and make it a bit more general purpose - that is, it will also be able to handle the second player/joypad.
Since input handling is common functionality, create two new files src/Common/Joypad.{inc,s} with the following content:
The code here is essentially the same as described in part 8 for handling input. We pass the addresses where to store the input data via the stack, as described in part 6. But pay attention to a subtle change we made: we switched the usage of registers A and Y in lines 39 through 59. Since we now pass the addresses of where to store joypad data by stack (in contrast to using “global” address constants), we need to use indirect addressing. Unfortunately, the 65816 instruction set is not orthogonal, i.e., not all addressing modes are supported by all instructions. The ldy instruction does not support direct page indirect addressing, but lda does - so we switch their usage to take advantage of indirect addressing on A.
You’ll probably come across this from time to time: you’ll have to rethink/refactor some of your logic because not all instructions support all addressing modes. It’s especially vexing at times with lda, ldy, and ldx and their storage counterparts. In fact, each
Next, we extract the logic that moves the sprites on the screen. Since this is game logic, we’ll create a new file src/Game/Input.{inc,s}:
Then we replace the main game loop GameLoop with this:
Finally, rename src/JoypadSprites.s to src/Main.s, and make sure you update your CMakeLists.txt files accordingly. Build and test your project to ensure all is still working as previously. If you get lost or confused, check out the SNES Assembly Adventure repository on GitHub.
Updating Registers.inc
This is an as good time as any to add the missing registers to src/common/Registers.inc. It follows the naming convention found in the SNES Development Manual. There are also a number of named constants at the end of the file that will help in the future. They’re meant to be used as bitmasked when working with registers. I’m not reproducing the entire file here, it’s just a boring list of names and numbers. Check the SNES Assembly Adventure repository on GitHub for the full file.
Initializing the SNES to a Defined State
So far, we’ve taken advantage of the emulator. We told it to set all memory to 0s all the way back in part 1:
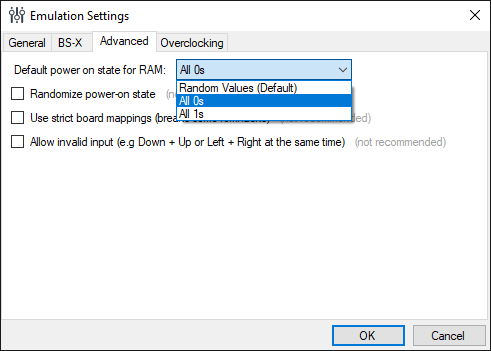
While this is rather convenient when working with an emulator that supports that, it, unfortunately, means that our code couldn’t run on actual hardware. If we set the “Default power on state RAM” option back to “Random Values (Default)”, we’ll find that every time we load our current demo code, we’ll see a random background color. That’s obviously not what we want.
The solution is to set all registers to a standard/initial value and clear all memory (VRAM, CGRAM, and OAMRAM) to a known value. To do this, we introduce four new helper subroutines, defined in files src/common/InitSNES.{inc.s}:
These four subroutines are pretty straightforward. You should have no trouble understanding what is going on here.
ClearRegisters (line 27) sets all registers to the value recommended in chapter 26 of the SNES Development Manual. It uses a handful of loops to traverse some address ranges more concisely.
ClearVRAM (line 92) and ClearCGRAM (line 120) are almost identical. The idea is to set up a DMA (Direct Memory Access, see part 7 if you need a refresher) and transfer a piece of constant data (here, simply zero/$00) to fill out the video and color RAM, respectively.
ClearOAMRAM (line 146) also uses DMA to transfer data to object attribute memory. But we need to take some extra care here. Remember that the SNES has a limit of 32 sprites per scanline. If we were to set all of OAM RAM to zero, that would result in all 128 possible sprites being rendered in the top left corner (that is, position (0, 0)). This could lead to some ugly rendering errors. The solution here is to move all sprites off-screen. So instead of clearing OAM RAM to $00, we’ll clear it to $ff - this will result in all sprites starting at position (-128, 241), that is, outside of the visible range. It is then for the actual game code to set these values correctly. Here, we just don’t want any sprites on screen when the console launches.
Final Touches
Finally, add the four new subroutines to the ResetHandler in src/Main.s:
Make sure to update all CMakeLists.txt files accordingly. Your final file structure should look like this:
snes_cradle/
    assets/
        Assets.inc
        Assets.s
        CMakeLists.txt
        SpriteColors.pal
        Sprites.vra
    cmake/
        CMakeCA65816Compiler.cmake.in
        CMakeCA65816Information.cmake
        CMakeDetermineCA65816Compiler.cmake
        CMakeTestCA65816Compiler.cmake
    src/
        common/
            CMakeLists.txt
            GameConstants.inc
            InitSNES.inc
            InitSNES.s
            Joypad.inc
            Joypad.s
            MemoryMapWRAM.inc
            Registers.inc
            Vector.s
        Game/
            CMakeLists.txt
            Init.inc
            Init.s
            Input.inc
            Input.s
        PPU/
            CMakeLists.txt
            PPU.inc
            PPU.s
        CMakeLists.txt
        Main.s
    CMakeLists.txt
    MemoryMap.cfg
Check the code on GitHub if you’re in doubt.
Conclusion
We did a lot of housekeeping and refactoring. Nothing really new happened here, but this little template should allow us to skip the initial setup each new project needs. So we can focus on writing our next demo or game. Which is what we will do next.
Next time, we’ll be learning a bit more about sprites, sprite ordering/priority, and how to generate color palettes on the fly.
Links and References
- undisbeliever has a great overview of all 65816 opcodes, you should bookmark this
- The official SNES Development Manual